Installing NiDB

NiDB is a light, powerful, and simple to use neuroimaging database. One of its main strengths is that it was developed using a stack of stable and proven technologies: Linux, Apache, MySQL/MariaDB, PHP, and Perl. None of these technologies are new, and the fact that they have been around for so many years means that there is a lot of documentation and literature available, as well as a myriad of libraries (for PHP and Perl) that can do virtually anything. Although both PHP and Perl have received some degree of criticism (not unreasonably), and in some cases are being replaced by tools such as Node.js and Python, the volume of information about them means it is easy to find solutions when problems appear.

This article covers installation steps for either CentOS or RHEL 7, but similar steps should work with other distributions since the overall strategy is the same. By separating apart each of the steps, as opposed to doing all the configuration and installation as a single script, it becomes easier to adapt to different systems, and to identify and correct problems that may arise due to local particularities. The steps below are derived from the scripts setup-centos7.sh and setup-ubuntu16.sh, that are available in the NiDB repository, but here these will be ignored. Note that the instructions below are not “official”; for the latter, consult the NiDB documentation.  The intent of this article is to facilitate the process and mitigate some frustration you may feel if trying to do it all by yourself. Also, by looking at the installation steps, you should be able to have a broad overview of the pieces that constitute database.

1) Begin with a fresh install.

If installing CentOS from the minimal DVD, choose a “Minimal Install” and leave to add the desktop in the next step.

2) Update the system.

This is a good time to install the most recent updates and patches, and reboot if the updates include a new kernel:

yum update
/sbin/reboot

3) Have a graphical mode.

While not strictly necessary, having a graphical interface for a web-based application will be handy. Install your favourite desktop, and a VNC server if you intend to manage the system remotely. For a lightweight desktop, consider MATE:

First add the EPEL repository. Depending on what you already have configured, use either:

yum install epel-release

or:

yum install https://dl.fedoraproject.org/pub/epel/epel-release-latest-7.noarch.rpm

Then:

yum groupinstall "MATE Desktop"
systemctl set-default graphical.target
systemctl isolate graphical.target
systemctl enable lightdm
systemctl start lightdm

For VNC, there are various options available. Consider, for example, TurboVNC.

4) Define some environment variables to be used later.

These will help when entering the commands later.

# Directory where NiDB will be installed
NIDBROOT=/nidb

# Directory of the webpages and PHP files:
WWWROOT=/var/www/html

# Linux username under which NiDB will run:
NIDBUSER=nidb

# MySQL/MariaDB root password:
MYSQLROOTPASS=[YOUR_PASSWORD_HERE]

# MySQL/MariaDB username that will have access to the database, and associated password:
MYSQLUSER=nidb
MYSQLPASS=[YOUR_PASSWORD_HERE]

These variables are only used during the installation, and all the steps here are done as root. Considering clearing your shell history at the end, so as not to have your passwords stored there.

5) Create an account for the user under which NiDB will run.

This is the user that will run the processes related to the database. It is not necessary that this user has administrative privileges on the system, and from a security perspective, it is better if not.

useradd -m ${NIDBUSER}
passwd ${NIDBUSER} # choose a sensible password

6) Install and configure Apache.

Add the repository for a more recent version, then install:

yum install httpd

Configure it to run as the ${NIDBUSER} user:

sed -i "s/User apache/User ${NIDBUSER}/" /etc/httpd/conf/httpd.conf
sed -i "s/Group apache/Group ${NIDBUSER}/" /etc/httpd/conf/httpd.conf

Enable it at boot, and also start it now:

systemctl enable httpd.service
systemctl start httpd.service

Open the relevant ports in the firewall, then reload the rules:

firewall-cmd --permanent --add-port=80/tcp
firewall-cmd --permanent --add-port=443/tcp
firewall-cmd --reload

7) Install and configure MySQL/MariaDB.

For MariaDB 10.2, the repository can be added to /etc/yum.repos.d/ as:

echo "[mariadb]
name = MariaDB
baseurl = http://yum.mariadb.org/10.2/centos7-amd64
gpgkey = https://yum.mariadb.org/RPM-GPG-KEY-MariaDB
gpgcheck = 1" >> /etc/yum.repos.d/MariaDB.repo

For other versions or distributions, visit this address. Then do the actual installation:

yum install MariaDB-server MariaDB-client

Enable it at boot and start now too:

systemctl enable mariadb.service
systemctl start mariadb.service

Secure the MySQL/MariaDB installation:

mysql_secure_installation

Pay attention to the questions on the root password and set it here to what was chosen in the ${MYSQLROOTPASS} variable. Make sure your database is secure.

8) Install and configure PHP.

First add the repositories for PHP 7.2:

yum install http://rpms.remirepo.net/enterprise/remi-release-7.rpm
yum install yum-utils
yum-config-manager --enable remi-php72
yum install php php-mysql php-gd php-process php-pear php-mcrypt php-mbstring

Install some additional PHP packages:

pear install Mail
pear install Mail_Mime
pear install Net_SMTP

Edit the PHP configuration:

sed -i 's/^short_open_tag = .*/short_open_tag = On/g' /etc/php.ini
sed -i 's/^session.gc_maxlifetime = .*/session.gc_maxlifetime = 28800/g' /etc/php.ini
sed -i 's/^memory_limit = .*/memory_limit = 5000M/g' /etc/php.ini
sed -i 's/^upload_tmp_dir = .*/upload_tmp_dir = \/${NIDBROOT}\/uploadtmp/g' /etc/php.ini
sed -i 's/^upload_max_filesize = .*/upload_max_filesize = 5000M/g' /etc/php.ini
sed -i 's/^max_file_uploads = .*/max_file_uploads = 1000/g' /etc/php.ini
sed -i 's/^max_input_time = .*/max_input_time = 600/g' /etc/php.ini
sed -i 's/^max_execution_time = .*/max_execution_time = 600/g' /etc/php.ini
sed -i 's/^post_max_size = .*/post_max_size = 5000M/g' /etc/php.ini
sed -i 's/^display_errors = .*/display_errors = On/g' /etc/php.ini
sed -i 's/^error_reporting = .*/error_reporting = E_ALL \& \~E_DEPRECATED \& \~E_STRICT \& \~E_NOTICE/' /etc/php.ini

Also, edit /etc/php.ini to make sure your timezone is correct, for example:

date.timezone = America/New_York

For a list of time zones, see here. Finally:

chown -R ${NIDBUSER}:${NIDBUSER} /var/lib/php/session

9) Install Perl and other pieces.

These are all in the main repositories already added so you should be able to simply run:

yum install perl* cpan git gcc gcc-c++ java ImageMagick vim libpng12 libmng wget iptraf* pv

Install also various Perl packages from CPAN. The first time you run cpan, various configuration questions will be asked; it is safe to accept default answers for all:

cpan File::Path
cpan Net::SMTP::TLS
cpan List::Util
cpan Date::Parse
cpan Image::ExifTool
cpan String::CRC32
cpan Date::Manip
cpan Sort::Naturally
cpan Digest::MD5
cpan Digest::MD5::File
cpan Statistics::Basic
cpan Email::Send::SMTP::Gmail
cpan Math::Derivative

Then put these into a place where NiDB can find them:

mkdir /usr/local/lib64/perl5
cp -rv /root/perl5/lib/perl5/* /usr/local/lib64/perl5/

10) (Optional) Disable SELinux.

Disabling SELinux is not strictly necessary provided that you ensure that all processes related to NiDB (webserver, database server), and all its files, belong to the same user, nidb, and that file access policies are set correctly. In any case, you may feel this is useful so as to stop receiving too many irrelevant warnings during the installation. You can enable it again later.

sed -i 's/^SELINUX=.*/SELINUX=disabled/g' /etc/selinux/config
setenforce 0

Note that enabling or disabling SELinux requires a reboot to take effect (it is not sufficient to simply restart a daemon; there is not one in fact).

11) Install FSL.

FSL functions are used by various internal scripts. After the installation, make sure the environment variable FSLDIR exists and points to the correct location (typically /usr/local/fsl, but can be different if you installed it elsewhere). This variable is used below when defining the crontab jobs.

FSLDIR=/usr/local/fsl

12) Download and install the NiDB files.

The official Github repository is https://github.com/gbook/nidb. However, I have made a fork with a couple of changes that better adapt to the system I am working with. You can probably go with either way.

mkdir -p ${NIDBROOT}
cd ${NIDBROOT}
mkdir -p archive backup dicomincoming deleted download ftp incoming problem programs/lock programs/logs uploadtmp uploaded
git clone https://github.com/andersonwinkler/nidb install
cd install
cp -Rv setup/Mysql* /usr/local/lib64/perl5/
cp -Rv programs/* ${NIDBROOT}/programs/
cp -Rv web/* ${WWWROOT}/
chown -R ${NIDBUSER}:${NIDBUSER} ${NIDBROOT}
chown -R ${NIDBUSER}:${NIDBUSER} ${WWWROOT}

Edit the file ${WWWROOT}/functions.php and complete two pieces of configuration. Locate these two lines:

$cfg = LoadConfig();
date_default_timezone_set();

In the first parenthesis, (), put what you get when you run:

echo "${NIDBROOT}/programs/nidb.cfg"

whereas in the second (), put what you get when you run:

timedatectl | grep "Time zone:" | awk '{print $3}'

For example, depending on your variables and time zone, you could edit to look like this:

$cfg = LoadConfig("/nidb/programs/nidb.cfg");
date_default_timezone_set("America/New_York")

13) Set up the database.

First, create the nidb user in MySQL/MariaDB. This is the only user (other than root) that will be able to do anything in the database:

mysql -uroot -p${MYSQLROOTPASS} -e "CREATE USER '${MYSQLUSER}'@'%' IDENTIFIED BY '${MYSQLPASS}'; GRANT ALL PRIVILEGES ON *.* TO '${MYSQLUSER}'@'%';"

Now create the NiDB database proper:

cd ${NIDBROOT}/install/setup
mysql -uroot -p${MYSQLROOTPASS} -e "CREATE DATABASE IF NOT EXISTS nidb; GRANT ALL ON *.* TO 'root'@'localhost' IDENTIFIED BY '${MYSQLROOTPASS}'; FLUSH PRIVILEGES;"
mysql -uroot -p${MYSQLROOTPASS} nidb < nidb.sql
mysql -uroot -p${MYSQLROOTPASS} nidb < nidb-data.sql

14) Setup cron jobs.

These jobs will take care of various automated input/output tasks.

cat <<EOC > ~/tempcron.txt
* * * * * cd ${NIDBROOT}/programs; perl parsedicom.pl > /dev/null 2>&1
* * * * * cd ${NIDBROOT}/programs; perl modulemanager.pl > /dev/null 2>&1
* * * * * cd ${NIDBROOT}/programs; perl pipeline.pl > /dev/null 2>&1
* * * * * cd ${NIDBROOT}/programs; perl datarequests.pl > /dev/null 2>&1
* * * * * cd ${NIDBROOT}/programs; perl fileio.pl > /dev/null 2>&1
* * * * * cd ${NIDBROOT}/programs; perl importuploaded.pl > /dev/null 2>&1
* * * * * cd ${NIDBROOT}/programs; perl qc.pl > /dev/null 2>&1
* * * * * FSLDIR=${FSLDIR}; PATH=${FSLDIR}/bin:${PATH}; . ${FSLDIR}/etc/fslconf/fsl.sh; export FSLDIR PATH; cd ${NIDBROOT}/programs; perl mriqa.pl > /dev/null 2>&1
@hourly find ${NIDBROOT}/programs/logs/*.log -mtime +4 -exec rm {} \;
@daily  /usr/bin/mysqldump nidb -u root -p${MYSQLROOTPASS} | gzip > ${NIDBROOT}/backup/db-\$(date +%Y-%m-%d).sql.gz
@hourly /bin/find /tmp/* -mmin +120 -exec rm -rf {} \;
@daily  find ${NIDBROOT}/ftp/* -mtime +7 -exec rm -rf {} \
@daily  find ${NIDBROOT}/tmp/* -mtime +7 -exec rm -rf {} \;
EOC
crontab -u ${NIDBUSER} ~/tempcron.txt && rm ~/tempcron.txt

15) Edit the main configuration.

The main configuration file, ${NIDBROOT}/programs/nidb.cfg, should be edited to reflect your paths, usernames, and passwords. It is this file that will contain the admin password for accessing NiDB. Use the ${NIDBROOT}/programs/nidb.cfg.sample as an example.

Once you have logged in as admin, you can also edit this file again in the database interface, in the menu Admin -> NiDB Settings.

16) (Optional) Install a MySQL/MariaDB frontend.

It will likely increase your productivity when doing maintenance to have a friendly frontend for MySQL/MariaDB. Two popular choices are phpMyAdmin (web-based) and Oracle MySQL Workbench.

For phpMyAdmin:

wget https://www.phpmyadmin.net/downloads/phpMyAdmin-latest-english.zip
unzip phpMyAdmin-latest-english.zip
mv phpMyAdmin-*-english ${WWWROOT}/phpMyAdmin
chown -R ${NIDBUSER}:${NIDBUSER} ${WWWROOT}
chmod 755 ${WWWROOT}
cp ${WWWROOT}/phpMyAdmin/config.sample.inc.php ${WWWROOT}/phpMyAdmin/config.inc.php

For MySQL Workbench, the repositories are listed at this link:

wget http://dev.mysql.com/get/mysql57-community-release-el7-11.noarch.rpm
rpm -Uvh mysql57-community-release-el7-11.noarch.rpm
yum install mysql-workbench

However, at the time of this writing, the current version (6.3.10) crashes upon start. The solution is to downgrade:

yum install yum-plugin-versionlock
yum versionlock mysql-workbench-community-6.3.8-1.el7.*
yum install mysql-workbench-community

17) That’s it!

You should by now have a working installation of NiDB, accessible from your web-browser at http://localhost. There are additional pieces you may consider configuring, such as a listener in one of your server ports to bring DICOMs from the scanner in automatically as the images are collected, and also other changes to the database schema and web interface. Now you have a starting point.

References

For more information on NiDB, see these two papers:


Downsampling (decimating) a brain surface

Downsampled average cortical surfaces at different iterations (n), with the respective number of vertices (V), edges (E) and faces (F).

In the previous post, a method to display brain surfaces interactively in PDF documents was presented. While the method is already much more efficient than it was when it first appeared some years ago, the display of highly resolved meshes can be computationally intensive, and may make even the most enthusiastic readers give up even opening the file.

If the data being shown has low spatial frequency, an alternative way to display, which preserves generally the amount of information, is to decimate the mesh, downsampling it to a lower resolution. Although in theory this can be done in the native (subject-level) geometry through retessellation (i.e., interpolation of coordinates), the interest in downsampling usually is at the group level, in which case the subjects have all been interpolated to a common grid, which in general is a geodesic sphere produced by subdividing recursively an icosahedron (see this earlier post). If, at each iteration, the vertices and faces are added in a certain order (such as in FreeSurfer‘s fsaverage or in the one generated with the platonic command), downsampling is relatively straightforward, whatever is the type of data.

Vertexwise data

For vertexwise data, downsampling can be based on the fact that vertices are added (appended) in a certain order as the icosahedron is constructed:

  • Vertices 1-12 correspond to n = 0, i.e., no subdivision, or ico0.
  • Vertices 13-42 correspond to the vertices that, once added to the ico0, make it ico1 (first iteration of subdivision, n = 1).
  • Vertices 43-162 correspond to the vertices that, once added to ico1, make it ico2 (second iteration, n = 2).
  • Vertices 163-642, likewise, make ico3.
  • Vertices 643-2562 make ico4.
  • Vertices 2563-10242 make ico5.
  • Vertices 10243-40962 make ico6, etc.

Thus, if the data is vertexwise (also known as curvature, such as cortical thickness or curvature indices proper), the above information is sufficient to downsample the data: to reduce down to an ico3, for instance, all what one needs to do is to pick the vertices 1 through 642, ignoring 643 onwards.

Facewise data

Data stored at each face (triangle) generally correspond to areal quantities, that require mass conservation. For both fsaverage and platonic icosahedrons, the faces are added in a particular order such that, at each iteration of the subdivision, a given face index is replaced in situ for four other faces: one can simply collapse (via sum or average) the data of every four faces into a new one.

Surface geometry

If the objective is to decimate the surface geometry, i.e., the mesh itself, as opposed to quantities assigned to vertices or faces, one can use similar steps:

  1. Select the vertices from the first up to the last vertex of the icosahedron in the level needed.
  2. Iteratively downsample the face indices by selecting first those that are formed by three vertices that were appended for the current iteration, then for those that have two vertices appended in the current iteration, then connecting the remaining three vertices to form a new, larger face.

Applications

Using downsampled data is useful not only to display meshes in PDF documents, but also, some analyses may not require a high resolution as the default mesh (ico7), particularly for processes that vary smoothly across the cortex, such as cortical thickness. Using a lower resolution mesh can be just as informative, while operating at a fraction of the computational cost.

A script

A script that does the tasks above using Matlab/Octave is here: icodown.m. It is also available as part of the areal package described here, which also satisfies all its dependencies. Input and output formats are described here.

Interactive 3D brains in PDF documents

A screenshot from Acrobat Reader. The example file is here.

Would it not be helpful to be able to navigate through tri-dimensional, surface-based representations of the brain when reading a paper, without having to download separate datasets, or using external software? Since 2004, with the release of the version 1.6 of the Portable Document Format (PDF), this has been possible. However, the means to generate the file were not easily available until about 2008, when Intel released of a set of libraries and tools. This still did not help much to improve popularity, as in-document rendering of complex 3D models requires a lot of memory and processing, making its use difficult in practice at the time. The fact that Acrobat Reader was a lot bloated did not help much either.

Now, almost eight years later, things have become easier for users who want to open these documents. Newer versions of Acrobat are much lighter, and capabilities of ordinary computers have increased. Yet, it seems the interest on this kind of visualisation have faded. The objective of this post is to show that it is remarkably simple to have interactive 3D objects in PDF documents, which can be used in any document published online, including theses, presentations, and papers: journals as PNAS and Journal of Neuroscience are at the forefront in accepting interactive manuscripts.

Requirements

  • U3D Tools: Make sure you have the IDTFConverter utility, from the U3D tools, available on SourceForge as part of the MathGL library. A direct link to version 1.4.4 is here; an alternative link, of a repackaged version of the same, is here. Compiling instructions for Linux and Mac are in the “readme” file. There are some dependencies that must be satisfied, and are described in the documentation. If you decide not to install the U3D tools, but only compile them, make sure the path of the executable is both in the $PATH and in the $LD_LIBRARY_PATH. This can be done with:
cd /path/to/the/directory/of/IDTFConverter
export PATH=${PATH}:$(pwd)
export LD_LIBRARY_PATH=${LD_LIBRARY_PATH}:$(pwd)
  • The ply2idtf function: Make sure you have the latest version of the areal package, which contains the MATLAB/Octave function ply2idtf.m used below.
  • Certain LaTeX packages: The packages movie15 or media9, that allow embedding the 3D object into the PDF using LaTeX. Either will work. Below it is assumed the older, movie15 package, is used.

Step 1: Generate the PLY maps

Once you have a map of vertexwise cortical data that needs to be shown, follow the instructions from this earlier blog post that explains how to generate Stanford PLY files to display colour-coded vertexwise data. These PLY files will be used below.

Step 2: Convert the PLY to IDTF files

IDTF stands for Intermediate Data Text Format. As the name implies, it is a text, intermediate file, used as a step before the creation of the U3D files, the latter that are embedded into the PDF. Use the function ply2idtf for this:

ply2idtf(...
   {'lh.pial.thickness.avg.ply','LEFT', eye(4);...
    'rh.pial.thickness.avg.ply','RIGHT',eye(4)},...
    'thickness.idtf');

The first argument is a cell array with 3 columns, and as many rows as PLY files being added to the IDTF file. The first column contains the file name, the second the label (or node) that for that file, and the third an affine matrix that maps the coordinates from the PLY file to the world coordinate system of the (to be created) U3D. The second (last) argument to the command is the name of the output file.

Step 3: Convert the IDTF to U3D files

From a terminal window (not MATLAB or Octave), run:

IDTFConverter -input thickness.idtf -output thickness.u3d

Step 4: Configure default views

Here we use the older movie15 LaTeX package, and the same can be accomplished with the newer, media9 package. Various viewing options are configurable, all of which are described in the documentation. These options can be saved in a text file with extension .vws, and later supplied in the LaTeX document. An example is below.

VIEW=Both Hemispheres
  COO=0 -14 0,
  C2C=-0.75 0.20 0.65
  ROO=325
  AAC=30
  ROLL=-0.03
  BGCOLOR=.5 .5 .5
  RENDERMODE=Solid
  LIGHTS=CAD
  PART=LEFT
    VISIBLE=true
  END
  PART=RIGHT
    VISIBLE=true
  END
END
VIEW=Left Hemisphere
  COO=0 -14 0,
  C2C=-1 0 0
  ROO=325
  AAC=30
  ROLL=-0.03
  BGCOLOR=.5 .5 .5
  RENDERMODE=Solid
  LIGHTS=CAD
  PART=LEFT
    VISIBLE=true
  END
  PART=RIGHT
    VISIBLE=false
  END
END
VIEW=Right Hemisphere
  COO=0 -14 0,
  C2C=1 0 0
  ROO=325
  AAC=30
  ROLL=0.03
  BGCOLOR=.5 .5 .5
  RENDERMODE=Solid
  LIGHTS=CAD
  PART=LEFT
    VISIBLE=false
  END
  PART=RIGHT
    VISIBLE=true
  END
END

Step 5: Add the U3D to the LaTeX source

Interactive, 3D viewing is unfortunately not supported by most PDF readers. However, it is supported by the official Adobe Acrobat Reader since version 7.0, including the recent version DC. Thus, it is important to let the users/readers of the document know that they must open the file using a recent version of Acrobat. This can be done in the document itself, using a message placed with the option text of the \includemovie command of the movie15 package. A minimalistic LaTeX source is shown below (it can be downloaded here).

\documentclass{article}

% Relevant package:
\usepackage[3D]{movie15}

% pdfLaTeX and color links setup:
\usepackage{color}
\usepackage[pdftex]{hyperref}
\definecolor{colorlink}{rgb}{0, 0, .6}  % dark blue
\hypersetup{colorlinks=true,citecolor=colorlink,filecolor=colorlink,linkcolor=colorlink,urlcolor=colorlink}

\begin{document}
\title{Interactive 3D brains in PDF documents}
\author{}
\date{}
\maketitle

\begin{figure}[!h]
\begin{center}
\includemovie[
text=\fbox{\parbox[c][9cm][c]{9cm}{\centering {\footnotesize (Use \href{http://get.adobe.com/reader/}{Adobe Acrobat Reader 7.0+} \\to view the interactive content.)}}},
poster,label=Average,3Dviews2=pial.vws]{10cm}{10cm}{thickness.u3d}
\caption{An average 3D brain, showing colour-coded average thickness (for simplicity, colour scale not shown). Click to rotate. Right-click to for a menu with various options. Details at \href{http://brainder.org}{http://brainder.org}.}
\end{center}
\end{figure}

\end{document}

Step 6: Generate the PDF

For LaTeX, use pdfLaTeX as usual:

pdflatex document.tex

What you get

After generating the PDF, the result of this example is shown here (a screenshot is at the top). It is possible to rotate in any direction, zoom, pan, change views to predefined modes, and alternate between orthogonal and perspective projections. It’s also possible to change rendering modes (including transparency), and experiment with various lightning options.

In Acrobat Reader, by right-clicking, a menu with various useful options is presented. A toolbar (as shown in the top image) can also be enabled through the menu.

The same strategy works also with the Beamer class, such that interactive slides can be created and used in talks, and with XeTeX, allowing these with a richer variety of text fonts.

See also

  • Wikipedia has an article on U3D files.
  • Alexandre Gramfort has developed a set of tools that covers quite much the same as above. It’s freely available in Matlab FileExchange.
  • To display molecules interactively (including proteins), the steps are similar. Instructions for Jmol and Pymol are available.
  • Commercial products offering features that build on these resources are also available.

The NIFTI-2 file format

In a previous post, the nifti-1 file format was presented. An update of this format has recently been produced by the Data Format Working Group (dfwg). The updated version retains generally the same amount of information as the previous, with the crucial difference that it allows far more datapoints in each dimension, thus permitting that the same overall file structure is used to store, for instance, surface-based scalar data, or large connectivity matrices. Neither of these had originally been intended at the time the analyze or the nifti-1 formats were developed. While packages as FreeSurfer developed their own formats for surface-based scalar data, a more general solution was still pending.

Compatible, but not as before

Users who participated of the transition from analyze to nifti-1 may remember that the same libraries used to read analyze would read nifti, perhaps with a few minor difficulties, but the bulk of the actual data would be read by most analyze-compliant applications. This was possible because a large part of the relevant information in the header was kept exactly in the same position counted from the beginning of the file. An application could read information at a given byte position and locate it without error, or without finding something else.

This time things are different. While a large degree of compatibility exists, this compatibility helps more the developer than the end user. If before, an application made to read only analyze could read nifti-1, this time an application made to read nifti-1 will not read nifti-2 without a few, even if minor, changes to the application source code. To put in other words, the new version of the format is not bitwise compatible with the previous one. The reasons for this “almost compatibility” will become clear below.

Changing types

The limitation that became evident with the new uses found for the nifti format refer particularly to the maximum number of points (e.g., voxels) in each dimension. This limitation stems from the field short dim[8], which allows only 2 bytes (16 bits) for each dimension; since only positive values are accepted (short is signed), this imposes a cap: no more than 215-1 = 32767 voxels per dimension. In the nifti-2 format, this was replaced by int64_t dim[8], which guarantees 8 bytes (64 bits) per dimension, and so, a much larger number of points per dimension, that is, 263-1 = 9,223,372,036,854,775,807.

This change alone already renders the nifti-2 not bitwise compatible with the nifti-1. Yet, other changes were made, some as a consequence of the modifications to dim[8], such as slice_start and slice_end, both too promoted from short to int64_t. Other changes were made so as to improve the general ability to store data with higher precision. A complete table listing the modifications of the field types is below:

NIFTI-1 NIFTI-2
short dim[8] int64_t dim[8]
float intent_p1 double intent_p1
float intent_p2 double intent_p2
float intent_p3 double intent_p3
float pixdim[8] double pixdim[8]
float vox_offset int64_t vox_offset
float scl_slope double scl_slope
float scl_inter double scl_inter
float cal_max double cal_max
float cal_min double cal_min
float slice_duration double slice_duration
float toffset double toffset
short slice_start int64_t slice_start
short slice_end int64_t slice_end
char slice_code int32_t slice_code
char xyzt_units int32_t xyzt_units
short intent_code int32_t intent_code
short qform_code int32_t qform_code
short sform_code int32_t sform_code
float quatern_b double quatern_b
float quatern_c double quatern_c
float quatern_d double quatern_d
float srow_x double srow_x
float srow_y double srow_y
float srow_z double srow_z
char magic[4] char magic[8]

Fields removed, fields reordered, fields added

Seven fields that only existed in the nifti-1 for compatibility with the old analyze format were removed entirely. These are:

  • char data_type[10]
  • char db_name[18]
  • int extents
  • short session_error
  • char regular
  • int glmin
  • int glmax

Another change is that the fields were reordered, which is an improvement over the nifti-1: the magic string, for instance, is now at the beginning of the file, which helps testing what kind of file it is. All constraints that were imposed on the nifti-1 to allow compatibility with the analyze were finally dropped. At the far end of the header, a field with 15 bytes was included for padding the header to a total size of 540, and to ensure 16-byte alignment after the 4 final bytes that indicate extra information are included.

Overview of the new header structure

With the modifications above, the overall structure of the he nifti-2 became:

Type Name Offset Size Description
int sizeof_hdr 0B 4B Size of the header. Must be 540 (bytes).
char magic[8] 4B 8B Magic string, defining a valid signature.
int16_t data_type 12B 2B Data type.
int16_t bitpix 14B 2B Number of bits per voxel.
int64_t dim[8] 16B 64B Data array dimensions.
double intent_p1 80B 8B 1st intent parameter.
double intent_p2 88B 8B 2nd intent parameter.
double intent_p3 96B 8B 3rd intent parameter.
double pixdim[8] 104B 64B Grid spacings (unit per dimension).
int64_t vox_offset 168B 8B Offset into a .nii file.
double scl_slope 176B 8B Data scaling, slope.
double scl_inter 184B 8B Data scaling, offset.
double cal_max 192B 8B Maximum display intensity.
double cal_min 200B 8B Minimum display intensity.
double slice_duration 208B 8B Time for one slice.
double toffset 216B 8B Time axis shift.
int64_t slice_start 224B 8B First slice index.
int64_t slice_end 232B 8B Last slice index.
char descrip[80] 240B 80B Any text.
char aux_file[24] 320B 24B Auxiliary filename.
int qform_code 344B 4B Use the quaternion fields.
int sform_code 348B 4B Use of the affine fields.
double quatern_b 352B 8B Quaternion b parameter.
double quatern_c 360B 8B Quaternion c parameter.
double quatern_d 368B 8B Quaternion d parameter.
double qoffset_x 376B 8B Quaternion x shift.
double qoffset_y 384B 8B Quaternion y shift.
double qoffset_z 392B 8B Quaternion z shift.
double srow_x[4] 400B 32B 1st row affine transform.
double srow_y[4] 432B 32B 2nd row affine transform.
double srow_z[4] 464B 32B 3rd row affine transform.
int slice_code 496B 4B Slice timing order.
int xyzt_units 500B 4B Units of pixdim[1..4].
int intent_code 504B 4B nifti intent.
char intent_name[16] 508B 16B Name or meaning of the data.
char dim_info 524B 1B Encoding directions.
char unused_str[15] 525B 15B Unused, to be padded with with zeroes.
Total size 540B

NIFTI-1 or NIFTI-2?

For the developer writing input/output functions to handle nifti files, a simple check can be used to test the version and the endianness of the file: the first four bytes are read (int sizeof_hdr): if equal to 348, then it is a nifti-1 file; if equal to 540, then it is a nifti-2 file. If equal to neither, then swap the bytes, as if reading in the non-native endianness, and repeat the test; if this time the size of the header is found as 348 or 540, the version is determined, and this also implies that all bytes in the file need to be swapped to match the endianness of the current architecture. If, however, the first four bytes do not contain 348 or 540 in either endianness, then it is not a valid nifti file.

Once the version and the endianness have been determined, if it is a nifti-1 file, jump to byte 344 and check if the content is 'ni1' (or '6E 69 31 00' in hexadecimal), indicating a pair .hdr/.img, or if it is 'n+1' ('6E 2B 31 00'), indicating a single .nii file. If, however, it is a nifti-2 file, just read the next 8 bytes and check if the content is 'n+2' ('6E 2B 32 00') followed by '0D 0A 1A 0A' (hex).

Storing extra information

Just like the nifti-1, the four bytes after the end of the nifti-2 header are used to indicate extensions and more information. Thus, the actual data begins after the byte 544. See the post on the nifti-1 for details. The cifti-2 file format (used extensively by the Human Connectome Project) is built on top of the nifti-2 format, and uses this extra information.

More information

The official definition of the nifti-2 format is available as a c header file (nifti2.h) here and mirrored here.

Fast surface smoothing on a common grid

Smoothing scalar data on the surface of a high resolution sphere can be a slow process. If the filter is not truncated, the distances between all the vertices or barycentres of faces need to be calculated, in a very time consuming process. If the filter is truncated, the process can be faster, but with resolutions typically used in brain imaging, it can still be very slow, a problem that is amplified if data from many subjects are analysed.

However, if the data for each subject have already been interpolated to a common grid, such as an icosahedron recursively subdivided multiple times (details here), then the distances do not need to be calculated repeatedly for each of them. Doing so just once suffices. Furthermore, the implementation of the filter itself can be made in such a way that the smoothing process can be performed as a single matrix multiplication.

Consider the smoothing defined in Lombardi, (2002), which we used in Winkler et al., (2012):

\tilde{Q}_n = \dfrac{\sum_j Q_j K\left(g\left(\mathbf{x}_n,\mathbf{x}_j\right)\right)}{\sum_j K\left(g\left(\mathbf{x}_n,\mathbf{x}_j\right)\right)}

where \tilde{Q}_n is the smoothed quantity at the vertex or face n, Q_j is the quantity assigned to the j-th vertex or face of a sphere containining J vertices or faces, g\left(\mathbf{x}_n,\mathbf{x}_j\right) is the geodesic distance between vertices or faces with coordinates \mathbf{x}_n and \mathbf{x}_j, and K(g) is the Gaussian filter, defined as a function of the geodesic distance between points.

The above formula requires that all distances between the current vertex or face n and the other points j are calculated, and that this is repeated for each n, in a time consuming process that needs to be repeated over again for every additional subject. If, however, the distances g are known and organised into a distance matrix \mathbf{G}, the filter can take the form of a matrix of the same size, \mathbf{K}, with the values at each row scaled so as to add up to unity, and the same smoothing can proceed as a simple matrix multiplication:

\mathbf{\tilde{Q}} = \mathbf{K}\mathbf{Q}

If the grid is the same for all subjects, which is the typical case when comparisons across subjects are performed, \mathbf{K} can be calculated just once, saved, and reused for each subject.

It should be noted, however, that although running faster, the method requires much more memory. For a filter of full-width at half-maximum (FWHM) f, truncated at a distance t \cdot f from the filter center, in a sphere of radius r, the number of non-zero elements in \mathbf{K} is approximately:

\text{nnz} \approx \dfrac{J^2}{2} \left(1-\cos\left(t \cdot \dfrac{f}{r}\right)\right)

whereas the total number of elements is J^2. Even using sparse matrices, this may require a large amount of memory space. For practical purposes, a filter with width f = 20 mm can be truncated at twice the width (t = 2), for application in a sphere with 100 mm made by 7 subdivisions of an icosahedron, still comfortably in a computer with 16GB of RAM. Wider filters may require more memory to run.

The script smoothdpx, part of the areal interpolation tools, available here, can be used to do both things, that is, smooth the data for any given subject, and also save the filter so that it can be reused with other subjects. To apply a previously saved filter, the rpncalc can be used. These commands require Octave or MATLAB, and if Octave is available, they can be executed directly from the command line.

Figures

The figures above represent facewise data on the surface of a sphere of 100 mm radius, made by recursive subdivision of a regular icosahedron 4 times, constructed with the platonic command (details here), shown without smoothing, and smoothed with filters with FWHM = 7, 14, 21, 28 and 35 mm.

References

Displaying vertexwise and facewise brain maps

In a previous post, a method to display FreeSurfer cortical regions in arbitrary colours was presented. Suppose that, instead, you would like to display the results from vertexwise or facewise analyses. For vertexwise, these can be shown using tksurfer or Freeview. The same does not apply, however, to facewise data, which, at the time of this writing, is not available in any neuroimaging software. In this article a tool to generate files with facewise or vertexwise data is provided, along with some simple examples.

The dpx2map tool

The tool to generate the maps is dpx2map (right-click to download, then make it executable). Call it without arguments to get usage information. This tool uses Octave as the backend, and it assumes that it is installed in its usual location (/usr/bin/octave). It is also possible to run it from inside Octave or Matlab using a slight variant, dpx2map.m (in which case, type help dpx2map for usage).

In either case, the commands srfread, dpxread and mtlwrite must be available. These are part of the areal package discussed here. And yes, dpx2map is now included in the latest release of the package too.

To use dpx2map, you need to specify a surface object that will provide the geometry on which the data colours will be overlaid, and the data itself. The surface should be in FreeSurfer format (*.asc or *.srf), and the data should be in FreeSurfer “curvature” format (*.asc, *.dpv) for vertexwise, or in facewise format (*.dpf). A description of these formats is available here.

It is possible to specify the data range that will be used when computing the scaling to make the colours, as well which range will be actually shown. It is also possible to split the scale so that a central part of it is omitted or shown in a colour outside the colourscale. This is useful to show thresholded positive and negative maps.

The output is saved either in Stanford Polygon (*.ply) for vertexwise, or in Wavefront Object (*.obj + *.mtl) for facewise data, and can be imported directly in many computer graphics software. All input and output files must be/are in their respective ascii versions, not binary. The command also outputs a image with the colourbar, in Portable Network Graphics format (*.png).

An example object

With a simple geometric shape as this it is much simpler to demonstrate how to generate the maps, than using a complicated object as the brain. The strategy for colouring remains the same. For the next examples, an ellipsoid was created using the platonic command. The command line used was:

platonic ellipsoid.obj ico sph 7 '[.25 0 0 0; 0 3 0 0; 0 0 .25 0; 0 0 0 1]'

This ellipsoid has maximum y-coordinate equal to 3, and a maximum x- and z-coordinates equal to 0.25. This file was converted from Wavefront *.obj to FreeSurfer ascii, and scalar fields simply describing the coordinates (x,y,z), were created with:

obj2srf ellipsoid.obj > ellipsoid.srf
srf2area ellipsoid.srf ellipsoid.dpv dpv
gawk '{print $1,$2,$3,$4,$2}' ellipsoid.dpv > ellipsoid-x.dpv
gawk '{print $1,$2,$3,$4,$3}' ellipsoid.dpv > ellipsoid-y.dpv
gawk '{print $1,$2,$3,$4,$4}' ellipsoid.dpv > ellipsoid-z.dpv

It is the ellipsoid-y.dpv that is used for the next examples.

Vertexwise examples

The examples below use the same surface (*.srf) and the same curvature, data-per-vertex file (*.dpv). The only differences are the way as the map is generated and presented, using different colour maps and different scaling. The jet colour map is the same available in Octave and Matlab. The coolhot5 is a custom colour map that will be made available, along with a few others, in another article to be posted soon.

Example A

In this example, defaults are used. The input files are specified, along with a prefix (exA) to be used to name the output files.

dpx2map ellipsoid-y.dpv ellipsoid.srf exA

Example B

In this example, the data between values -1.5 and 1.5 is coloured, and the remaining receive the colours of the extreme points (dark blue and dark red).

dpx2map ellipsoid-y.dpv ellipsoid.srf exB jet '[-1.5 1.5]'

Example C

In this example, the data between -2 and 2 is used to define the colours, with the values below/above receiving the extreme colours. However, the range between -1 and 1 is not shown or used for the colour scaling. This is because the dual option is set as true as well as the coption.

dpx2map ellipsoid-y.dpv ellipsoid.srf exC coolhot5 '[-2 2]' '[-1 1]' true '[.75 .75 .75]' true

Example D

This example is similar as above, except that the values between -1 and 1, despite not being shown, are used for the scaling of the colours. This is due to the coption being set as true.

dpx2map ellipsoid-y.dpv ellipsoid.srf exD coolhot5 '[-2 2]' '[-1 1]' true '[.75 .75 .75]' false

Example E

Here the data between -2 and 2 is used for scaling, but only the points between -1 and 1 are shown. This is because the option dual was set as false. The values below -1 or above 1 receive the same colours as these numbers, because the coption was configured as true. Note that because all points will receive some colour, it is not necessary to define the colourgap.

dpx2map ellipsoid-y.dpv ellipsoid.srf exE coolhot5 '[-2 2]' '[-1 1]' false '[]' true

Example F

This is similar as the previous example, except that the values between -1 and 1 receive a colour off of the colour map. This is because both dual and coption were set as false.

dpx2map ellipsoid-y.dpv ellipsoid.srf exF coolhot5 '[-2 2]' '[-1 1]' false '[.75 .75 .75]' false

Facewise data

The process to display facewise data is virtually identical. The only two differences are that (1) instead of supplying a *.dpv file, a *.dpf file is given to the script as input, and (2) the output isn’t a *.ply file, but instead a pair of files *.obj + *.mtl. Note that very few software can handle thousands of colours per object in the case of facewise data. Blender is recommended over most commercial products specially for this reason (and of course, it is free, as in freedom).

Download

The dpx2map is available here, and it is also included in the areal package, described here, where all its dependencies are satisfied. You must have Octave (free) or Matlab available to use this tool.

How to cite

If you use dpx2map for your scientific research, please, remember to mention the brainder.org website in your paper.

Update: Display in PDF documents

3D models as these, with vertexwise colours, can be shown in interactive PDF documents. Details here.

Merging multiple surfaces

Say you have a number of meshes in FreeSurfer ascii format (with extension *.asc or *.srf), one brain structure per file. However, for later processing or to import in some computer graphics software, you would like to have these multiple meshes all in a single file. This post provides a small script to accomplish this: mergesrf.

To use it, right click and save the file above, make it executable and, ideally, put it in a place where it can be found (or add its location to the environmental variable ${PATH}. Then run something as:

mergesrf file1.srf file2.srf fileN.srf mergedfile.srf

In this example, the output file is saved as mergedfile.srf. Another example is to convert all subcortical structures into just one large object, after aseg2srf as described here. To convert all, just change the current directory to ${SUBJECTS_DIR}//ascii, then run:

mergesrf * aseg_all.srf

A list with the input files and the output at the end is shown below:

The script uses Octave, which can be downloaded freely. The same script, with a small modification, can also run from inside matlab. This other version can be downloaded here: mergesrf.m

Requirements

In addition to Octave (or matlab), the script also requires functions to read and write surface files, which are available from the areal package (described here and downloadable here).

Brain meshes available

A set of 3D brain meshes produced with FreeSurfer and individually partitioned into separate files following the atlases of Desikan-Killiany, Destrieux et al., and Desikan-Killiany-Tourville (DKT), is now available for download here. Surfaces for subcortical structures are also available.

These meshes are meant to be used to help with scientific visualisation and/or artistic rendering in computer graphics software, most prominently Blender, but also in any other application that can import files in Wavefront (*.obj) or Stanford Polygon (*.ply) formats. The released files are under a Creative Commons license. See the download page for details.

The NIFTI file format

(This article is about the nifti-1 file format. For an overview of how the nifti-2 differs from the nifti-1, see this one.)

The Neuroimaging Informatics Technology Initiative (nifti) file format was envisioned about a decade ago as a replacement to the then widespread, yet problematic, analyze 7.5 file format. The main problem with the previous format was perhaps the lack of adequate information about orientation in space, such that the stored data could not be unambiguously interpreted. Although the file was used by many different imaging software, the lack of adequate information on orientation obliged some, most notably spm, to include, for every analyze file, an accompanying file describing the orientation, such as a file with extension .mat. The new format was defined in two meetings of the so called Data Format Working Group (dfwg) at the National Institutes of Health (nih), one in 31 March and another in 02 September of 2003. Representatives of some of the most popular neuroimaging software agreed upon a format that would include new information, and upon using the new format, either natively, or have it as an option to import and export.

Radiological or “neurological”?

Perhaps the most visible consequence of the lack of orientation information was the then reigning confusion between left and right sides of brain images during the years in which the analyze format was dominant. It was by this time that researchers became used to describe an image as being in “neurological” or in “radiological” convention. These terms have always been inadequate because, in the absence of orientation information, no two pieces of software necessarily would have to display the same file with the same side of the brain in the same side of the screen. A file could be shown in “neurological” orientation in one software, but in radiological orientation in another, to the dismay of an unaware user. Moreover, although there is indeed a convention adopted by virtually all manufacturers of radiological equipment to show the left side of the patient on the right side of the observer, as if the patient were being observed from face-to-face or, if lying supine, from the feet, it is not known whether reputable neurologists ever actually convened to create a “neurological” convention that would be just the opposite of the radiological. The way as radiological exams are normally shown reflects the reality of the medical examination, in which the physician commonly approaches the patient in the bed from the direction of the feet (usually there is a wall behind the bed), and tend to stay face-to-face most of the time. Although the neurological examination does indeed include a few manoeuvres performed at the back, for most of the time, even in the more specialised semiotics, the physician stays at the front. The nifti format obviated all these issues, rendering these terms obsolete. Software can now mark the left or the right side correctly, sometimes giving the option of showing it flipped to better adapt to the user personal orientation preference.

Same format, different presentations

A single image stored in the analyze 7.5 format requires two files: a header, with extension .hdr, to store meta-information, and the actual data, with extension .img. In order to keep compatibility with the previous format, data stored in nifti format also uses a pair of files, .hdr/.img. Care was taken so that the internal structure of the nifti format would be mostly compatible with the structure of the analyze format. However, the new format added some clever improvements. Work with a pair of files for each image as in the .hdr/.img, rather than just one, is not only inconvenient, but it is also error prone, as one might easily forget (or not know) that the data of interest is actually split across more than one file. To address this issue, the nifti format also allows for storage as a single file, with extension .nii. Single file or pair of files are not the only possible presentations, though. It is very common for images to have large areas of solid background, or files describing masks and regions of interest containing just a few unique values that appear repeated many times. Files like these occupy large space in the disk, but with little actual information content. This is the perfect case where compression can achieve excellent results. Indeed, both nifti and analyze files can be compressed. The deflate algorithm (used, e.g., by gzip) can operate in streams, allowing compression and decompression on-the-fly. The compressed versions have the .gz extension appended: .nii.gz (single file) or .hdr/.img.gz (pair of files, either nifti or analyze).

Predefined dimensions for space and time

In the nifti format, the first three dimensions are reserved to define the three spatial dimensions — x, y and z —, while the fourth dimension is reserved to define the time points — t. The remaining dimensions, from fifth to seventh, are for other uses. The fifth dimension, however, can still have some predefined uses, such as to store voxel-specific distributional parameters or to hold vector-based data.

Overview of the header structure

In order to keep compatibility with the analyze format, the size of the nifti header was maintained at 348 bytes as in the old format. Some fields were reused, some were preserved, but ignored, and some were entirely overwritten. The table below shows each of the fields, their sizes, and a brief description. More details on how each field should be interpreted are provided further below.

Type Name Offset Size Description
int sizeof_hdr 0B 4B Size of the header. Must be 348 (bytes).
char data_type[10] 4B 10B Not used; compatibility with analyze.
char db_name[18] 14B 18B Not used; compatibility with analyze.
int extents 32B 4B Not used; compatibility with analyze.
short session_error 36B 2B Not used; compatibility with analyze.
char regular 38B 1B Not used; compatibility with analyze.
char dim_info 39B 1B Encoding directions (phase, frequency, slice).
short dim[8] 40B 16B Data array dimensions.
float intent_p1 56B 4B 1st intent parameter.
float intent_p2 60B 4B 2nd intent parameter.
float intent_p3 64B 4B 3rd intent parameter.
short intent_code 68B 2B nifti intent.
short datatype 70B 2B Data type.
short bitpix 72B 2B Number of bits per voxel.
short slice_start 74B 2B First slice index.
float pixdim[8] 76B 32B Grid spacings (unit per dimension).
float vox_offset 108B 4B Offset into a .nii file.
float scl_slope 112B 4B Data scaling, slope.
float scl_inter 116B 4B Data scaling, offset.
short slice_end 120B 2B Last slice index.
char slice_code 122B 1B Slice timing order.
char xyzt_units 123B 1B Units of pixdim[1..4].
float cal_max 124B 4B Maximum display intensity.
float cal_min 128B 4B Minimum display intensity.
float slice_duration 132B 4B Time for one slice.
float toffset 136B 4B Time axis shift.
int glmax 140B 4B Not used; compatibility with analyze.
int glmin 144B 4B Not used; compatibility with analyze.
char descrip[80] 148B 80B Any text.
char aux_file[24] 228B 24B Auxiliary filename.
short qform_code 252B 2B Use the quaternion fields.
short sform_code 254B 2B Use of the affine fields.
float quatern_b 256B 4B Quaternion b parameter.
float quatern_c 260B 4B Quaternion c parameter.
float quatern_d 264B 4B Quaternion d parameter.
float qoffset_x 268B 4B Quaternion x shift.
float qoffset_y 272B 4B Quaternion y shift.
float qoffset_z 276B 4B Quaternion z shift.
float srow_x[4] 280B 16B 1st row affine transform
float srow_y[4] 296B 16B 2nd row affine transform.
float srow_z[4] 312B 16B 3rd row affine transform.
char intent_name[16] 328B 16B Name or meaning of the data.
char magic[4] 344B 4B Magic string.
Total size 348B

Each of these fields is described in mode detail below, in the order as they appear in the header.

Size of the header

The field int sizeof_hdr stores the size of the header. It must be 348 for a nifti or analyze format.

Dim info

The field char dim_info stores, in just one byte, the frequency encoding direction (1, 2 or 3), the phase encoding direction (1, 2 or 3), and the direction in which the volume was sliced during the acquisition (1, 2 or 3). For spiral sequences, frequency and phase encoding are both set as 0. The reason to collapse all this information in just one byte was to save space. See also the fields short slice_start, short slice_end, char slice_code and float slice_duration.

Image dimensions

The field short dim[8] contains the size of the image array. The first element (dim[0]) contains the number of dimensions (1-7). If dim[0] is not in this interval, the data is assumed to have opposite endianness and so, should be byte-swapped (the nifti standard does not specify a specific field for endianness, but encourages the use of dim[0] for this purpose). The dimensions 1, 2 and 3 are assumed to refer to space (x, y, z), the 4th dimension is assumed to refer to time, and the remaining dimensions, 5, 6 and 7, can be anything else. The value dim[i] is a positive integer representing the length of the i-th dimension.

Intent

The short intent_code is an integer that codifies that the data is supposed to contain. Some of these codes require extra-parameters, such as the number of degrees of freedom (df). These extra parameters, when needed, can be stored in the fields intent_p* when they can be applied to the image as a while, or in the 5th dimension if voxelwise. A list of intent codes is in the table below:

Intent Code Parameters
None 0 no parameters
Correlation 2 p1 = degrees of freedom (df)
t test 3 p1 = df
F test 4 p1 = numerator df, p2 = denominator df
z score 5 no parameters
\chi^2 statistic 6 p1 = df
Beta distribution 7 p1 = a, p2 = b
Binomial distribution 8 p1 = number of trials, p2 = probability per trial
Gamma distribution 9 p1 = shape, p2 = scale
Poisson distribution 10 p1 = mean
Normal distribution 11 p1 = mean, p2 = standard deviation
Noncentral F statistic 12 p1 = numerator df, p2 = denominator df, p3 = numerator noncentrality parameter
Noncentral \chi^2 statistic 13 p1 = dof, p2 = noncentrality parameter
Logistic distribution 14 p1 = location, p2 = scale
Laplace distribution 15 p1 = location, p2 = scale
Uniform distribution 16 p1 = lower end, p2 = upper end
Noncentral t statistic 17 p1 = dof, p2 = noncentrality parameter
Weibull distribution 18 p1 = location, p2 = scale, p3 = power
\chi distribution 19 p1 = df*
Inverse Gaussian 20 p1 = \mu, p2 = \lambda
Extreme value type I 21 p1 = location, p2 = scale
p-value 22 no parameters
-ln(p) 23 no parameters
-log(p) 24 no parameters

* Note: For the \chi distribution, when p1=1, it is a “half-normal” distribution; when p1=2, it is a Rayleigh distribution; and when p1=3, it is a Maxwell-Boltzmann distribution. Other intent codes are available to indicate that the file contains data that is not of statistical nature.

Intent Code Description
Estimate 1001 Estimate of some parameter, possibly indicated in intent_name
Label 1002 Indices of a set of labels, which may be indicated in aux_file.
NeuroName 1003 Indices in the NeuroNames set of labels.
Generic matrix 1004 For a MxN matrix in the 5th dimension, row major. p1 = M, p2 = N (integers as float); dim[5] = M*N.
Symmetric matrix 1005 For a symmetric NxN matrix in the 5th dimension, row major, lower matrix. p1 = N (integer as float); dim[5] = N*(N+1)/2.
Displacement vector 1006 Vector per voxel, stored in the 5th dimension.
Vector 1007 As above, vector per voxel, stored in the 5th dimension.
Point set 1008 Points in the space, in the 5th dimension. dim[1] = number of points; dim[2]=dim[3]=1; intent_name may be used to indicate modality.
Triangle 1009 Indices of points in space, in the 5th dimension. dim[1] = number of triangles.
Quaternion 1010 Quaternion in the 5th dimension.
Dimless 1011 Nothing. The intent may be in intent_name.
Time series 2001 Each voxel contains a time series.
Node index 2002 Each voxel is an index of a surface dataset.
rgb 2003 rgb triplet in the 5th dimension. dim[0] = 5, dim[1] has the number of entries, dim[2:4] = 1, dim[5] = 3.
rgba 2004 rgba quadruplet in the 5th dimension. dim[0] = 5, dim[1] has the number of entries, dim[2:4] = 1, dim[5] = 4.
Shape 2005 Value at each location is a shape parameter, such as a curvature.

The intent parameters are stored in the fields float intent_p1, float intent_p2 and float intent_p3. Alternatively, if the parameters are different for each voxel, they should be stored in the 5th dimension of the file. A human readable intent name can be stored in the field char intent_name[16], which may help to explain the intention of the data when it cannot or is not coded with any of the intent codes and parameters above.

Data type and bits per pixel/voxel

The field int datatype indicates the type of the data stored. Acceptable values are:

Type Bitpix Code
unknown 0
bool 1 bit 1
unsigned char 8 bits 2
signed short 16 bits 4
signed int 32 bits 8
float 32 bits 16
complex 64 bits 32
double 64 bits 64
rgb 24 bits 128
“all” 255
signed char 8 bits 256
unsigned short 16 bits 512
unsigned int 32 bits 768
long long 64 bits 1024
unsigned long long 64 bits 1280
long double 128 bits 1536
double pair 128 bits 1792
long double pair 256 bits 2048
rgba 32 bits 2304

The field short bitpix holds the information of the number of bits per voxel. The value must match the type determined by datatype as shown above.

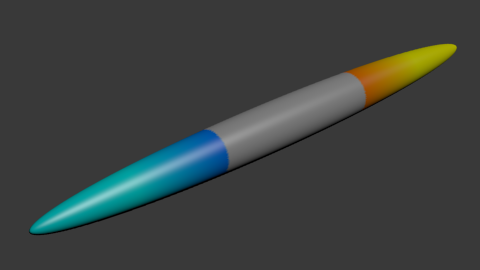
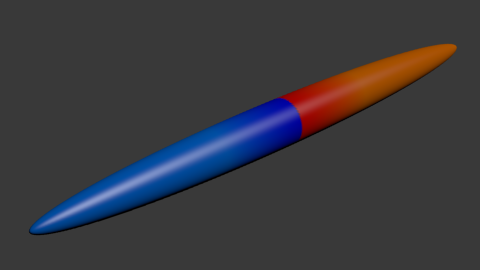
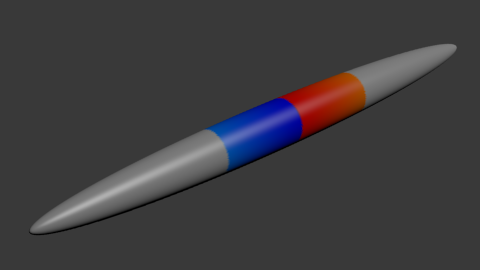
Slice acquisition information

The fields fields char slice_code, short slice_start, short slice_end and float slice_duration are useful to store information about the timing of an fMRI acquisition, and need to be used together with the char dim_info, which contains the field slice_dim. If, and only if, the slice_dim is different than zero, slice_code is interpreted as:

Code Interpretation
0 Slice order unknown
1 Sequential, increasing
2 Sequential, decreasing
3 Interleaved, increasing, starting at the 1st mri slice
4 Interleaved, decreasing, starting at the last mri slice
5 Interleaved, increasing, starting at the 2nd mri slice
6 Interleaved, decreasing, starting at one before the last mri slice

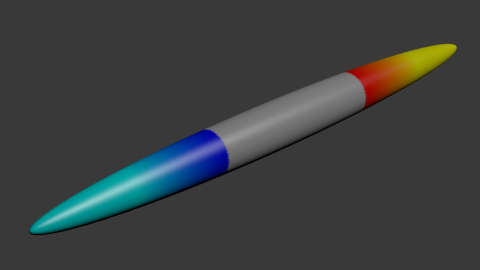
The fields short slice_start and short slice_end inform respectively which are the first the last slices that correspond to the actual mri acquisition. Slices present in the image that are outside this range are treated as padded slices (for instance, containing zeroes). The field float slice_duration indicates the amount of time needed to acquire a single slice. Having this information in a separate field allows to correctly store images of experiments in which slice_duration*dim[slice_dim] is smaller than the value stored in pixdim[4], usually the repetition time (tr).

Slice codes to specify slice acquisition timings. In this example, slice_start = 2 and slice_end = 11, indicating that slices #01 and #12 stored in the file have not been truly acquired with MRI, but instead, were padded to the file. The field slice_duration specifies how long it took to acquire each slice. The dimension that corresponds to the slice acquisition (in this case dim[3], z) is encoded in the field dim_info.

Voxel dimensions

The dimension for each voxel is stored in the field float pixdim[8], and each element match its respective in short dim[8]. The value in float pixdim[0], however, has a special meaning, discussed below; it should always be -1 or 1. The units of measurement for the first 4 dimensions are specified in the field xyzt_units, discussed below.

Voxel offset

The field int vox_offset indicates, for single files (.nii), the byte offset before the imaging data starts. For compatibility with older software, possible values are multiples of 16, and the minimum value is 352 (the smallest multiple of 16 that is larger than 348). For file pairs (.hdr/.img), this should be set as zero if no information other than image data itself is to be stored in the .img (most common), but it can also be larger than zero, allowing for user-defined extra-information to be prepended into the .img, such as a dicom header. In this case, however, the rule of being a multiple of 16 may eventually be violated. This field is of type float (32-bit, ieee-754), allowing integers up to 224 to be specified. The reason for using float rather than what would be the more natural choice, int, is to allow compatibility with the analyze format.

Data scaling

The values stored in each voxel can be linearly scaled to different units. The fields float scl_slope and float scl_inter define a slope and an intercept for a linear function. The data scaling feature allows the storage in a wider range than what would be allowed by the datatype. Yet, it is possible to use scaling within the same datatype. Both scaling fields should be ignored for the storage of rgb data. For complex types, it should be applied to both real and imaginary parts.

Data display

For files that store scalar (non-vector) data, the fields float cal_min and float cal_max determine the intended display range when the image is opened. Voxel values equal or below cal_min should be shown with the smallest colour in the colourscale (typically black in a gray-scale visualisation), and values equal or above cal_max should be shown with the largest colour in the colourscale (typically white).

Measurement units

Both spatial and temporal measurement units, used for the dimensions dim[1] to dim[4] (and, respectively, for pixdim[]), are encoded in the field char xyzt_units. The bits 1-3 are used to store the spatial dimensions, the bits 4-6 are for temporal dimensions, and the bits 6 and 7 are not used. A temporal offset can be specified in the field float toffset. The codes for xyzt_units, in decimal, are:

Unit Code
Unknown 0
Meter (m) 1
Milimeter (mm) 2
Micron (µm) 3
Seconds (s) 8
Miliseconds (ms) 16
Microseconds (µs) 24
Hertz (Hz) 32
Parts-per-million (ppm) 40
Radians per second (rad/s) 48

Description

This field, char descrip[80] can contain any text with up to 80 characters. The standard does not specify whether this string needs to be terminated by a null character or not. Presumably, it is up to the application to correctly handle it.

Auxiliary file

A supplementary file, containing extra-information, can be specified in the field char aux_file[24]. This file can, for instance, contain the face indices for meshes which points are stored in the 5th dimension or a look-up-table to display colours.

Orientation information

The most visible improvement of the nifti format over the previous analyze format is the ability to unambiguously store information orientation. The file standard assumes that the voxel coordinates refer to the center of each voxel, rather than at any of its corners. The world coordinate system is assumed to be ras: +x is Right, +y is Anterior and +z is Superior, which is precisely different than the coordinate system used in analyze, which is las. The format provides three different methods to map the voxel coordinates (i,j,k) to the world coordinates (x,y,z). The first method exists only to allow compatibility with the analyze format. The other two methods may coexist, and convey different coordinate systems. These systems are specified in the fields short qform_code and short sform_code, which can assume the values specified in the table:

Name Code Description
unknown 0 Arbitrary coordinates. Use Method 1.
scanner_anat 1 Scanner-based anatomical coordinates.
aligned_anat 2 Coordinates aligned to another file, or to the “truth” (with an arbitrary coordinate center).
talairach 3 Coordinates aligned to the Talairach space.
mni_152 4 Coordinates aligned to the mni space.

In principle, the qform_code (Method 2 below) should contain either 0, 1 or 2, whereas the sform_code (Method 3 below) could contain any of the codes shown in the table.

Method 1

The Method 1 is for compatibility with analyze and is not supposed to be used as the main orientation method. The world coordinates are determined simply by scaling by the voxel size:

\left[ \begin{array}{c} x\\ y\\ z \end{array} \right]= \left[ \begin{array}{c} i\\ j\\ k \end{array} \right]\odot \left[ \begin{array}{c} \mathtt{pixdim[1]}\\ \mathtt{pixdim[2]}\\ \mathtt{pixdim[3]}\\ \end{array} \right]

where \odot is the Hadamard product.

Method 2

The Method 2 is used when short qform_code is larger than zero, and is intended to be used to indicate the scanner coordinates, in a way that resembles the coordinates specified in the dicom header. It can also be used to represent the alignment of an image to a previous session of the same subject (such as for coregistration). For compactness and simplicity, the information in this field is stored as quaternions (a,b,c,d), which last three coefficients are in the fields float quatern_b, float quatern_c, float quatern_d. The first coefficient can be calculated from the other three as a = \sqrt{1-b^2-c^2-d^2}. These fields are used to construct a rotation matrix as:

\mathbf{R} = \left[ \begin{array}{ccc} a^2+b^2-c^2-d^2 & 2(bc-ad) & 2(bd+ac) \\ 2(bc+ad) & a^2+c^2-b^2-d^2 & 2(cd-ab) \\ 2(bd-ac) & 2(cd+ab) & a^2+d^2-b^2-c^2 \end{array} \right]

This rotation matrix, together with the voxel sizes and a translation vector, is used to define the final transformation from voxel to world space:

\left[ \begin{array}{c} x\\ y\\ z \end{array} \right]=\mathbf{R} \left[ \begin{array}{c} i\\ j\\ q\cdot k\\ \end{array} \right]\odot \left[ \begin{array}{c} \mathtt{pixdim[1]}\\ \mathtt{pixdim[2]}\\ \mathtt{pixdim[3]}\\ \end{array} \right]+ \left[ \begin{array}{c} \mathtt{qoffset\_x}\\ \mathtt{qoffset\_y}\\ \mathtt{qoffset\_z}\\ \end{array} \right]

where \odot is, again, the Hadamard product, and q is the qfac value, stored at the otherwise unused pixdim[0], which should be either -1 or 1. Any different value should be treated as 1.

Method 3

The Method 3 is used when short sform_code is larger than zero. It relies on a full affine matrix, stored in the header in the fields float srow_*[4], to map voxel to world coordinates:

\left[ \begin{array}{c} x\\ y\\ z\\ 1 \end{array} \right]=\left[ \begin{array}{cccc} \mathtt{srow\_x[0]} & \mathtt{srow\_x[1]} & \mathtt{srow\_x[2]} & \mathtt{srow\_x[3]}\\ \mathtt{srow\_y[0]} & \mathtt{srow\_y[1]} & \mathtt{srow\_y[2]} & \mathtt{srow\_y[3]}\\ \mathtt{srow\_z[0]} & \mathtt{srow\_z[1]} & \mathtt{srow\_z[2]} & \mathtt{srow\_z[3]} \\ 0 & 0 & 0 & 1\end{array} \right]\cdot\left[ \begin{array}{c} i\\ j\\ k\\ 1 \end{array} \right]

Differently than Method 2, which is supposed to contain a transformation that maps voxel indices to the scanner world coordinates, or to align between two distinct images of the same subject, the Method 3 is used to indicate the transformation to some standard world space, such as the Talairach or mni coordinates, in which case, the coordinate system has its origin (0,0,0) at the anterior comissure of the brain.

Magic string

The char magic[4] field is a “magic” string that declares the file as conforming with the nifti standard. It was placed at the very end of the header to avoid overwriting fields that are needed for the analyze format. Ideally, however, this string should be checked first. It should be 'ni1' (or '6E 69 31 00' in hexadecimal) for .hdr/.img pair, or 'n+1' (or '6E 2B 31 00') for a .nii single file. In the absence of this string, the file should be treated as analyze. Future versions of the nifti format may increment the string to 'n+2', 'n+3', etc. Indeed, as of 2012, a second version is under preparation.

Unused fields

The fields char data_type[10], char db_name[18], int extents, short session_error and char regular are not used by the nifti format, but were included in the header for compatibility with analyze. The extents should be the integer 16384, and regular should be the character 'r'. The fields int glmin and int glmax specify respectively the minimum and maximum of the entire dataset in the analyze format.

Storing extra-information

Extra information can be included in the nifti format in a number of ways as allowed by the standard. At the end of the header, the next 4 bytes (i.e., from byte 349 to 352, inclusive) may or may not be present in a .hdr file. However, these bytes will always be present in a .nii file. They should be interpreted as a character array, i.e. char extension[4]. In principle, these 4 bytes should be all set to zero. If the first, extension[0], is non-zero, this indicates the presence of extended information beginning at the byte number 353. Such extended information needs to have size multiple of 16. The first 8 bytes of this extension should be interpreted as two integers, int esize and int ecode. The field esize indicates the size of the extent, including the first 8 bytes that are the esize and ecode themselves. The field ecode indicates the format used for the remaining of the extension. At the time of this writing, three codes have been defined:

Code Use
0 Unknown. This code should be avoided.
2 dicom extensions
4 xml extensions used by the afni software package.

More than one extension can be present in the same file, each one always starting with the pair esize and ecode, and with its first byte immediately past the last byte of the previous extension. In a single .nii file, the float vox_offset must be set properly so that the imaging data begins only after the end of the last extension.

Problems

The nifti format brought a number of great benefits if compared to the old analyze format. However, it also brought its own set of new problems. Fortunately, these problems are not severe. Here are some:

  • Even though a huge effort was done to keep compatibility with analyze, a crucial aspect was not preserved: the world coordinate system is assumed, in the nifti format, to be ras, which is weird and confusing. The las is a much more logical choice from a medical perspective. Fortunately, since orientation is stored unambiguously, it is possible to later flip the images in the screen at will in most software.
  • The file format still relies too much on the file extension being .nii or on a pair .hdr/.img, rather than much less ambiguous magic strings or numbers. On the other hand, the different magic strings for single file and for file pairs effectively prevent the possibility of file splitting/merging using common operating system tools (such as dd in Linux), as the magic string needs to be changed, even though the header structure remains absolutely identical.
  • The magic string that is present in the header is not placed at the beginning, but near its end, which makes the file virtually unrecognisable outside of the neuroimaging field.
  • The specification of three different coordinate systems, while bringing flexibility, also brought ambiguity, as nowhere in the standard there is information on which should be preferred when more than one is present. Certain software packages explicitly force the qform_code and sform_code to be identical to each other.
  • There is no field specifying a preferred interpolation method when using Methods 2 or 3, even though these methods do allow fractional voxels to be found with the specification of world coordinates.
  • Method 2 allows only rotation and translation, but sometimes, due to all sorts of scanner calibration issues and different kinds of geometric distortion present in different sequences, the coregistration between two images of the same subject may require scaling and shear, which are only provided in Method 3.
  • Method 3 is supposed to inform that the data is aligned to a standard space using an affine transformation. This works perfectly if the data has been previously warped to such a space. Otherwise, the simple alignment of any actual brain from native to standard space cannot be obtained with only linear transformations.
  • To squeeze information while keeping compatibility with the analyze format, some fields had to be mangled into just one byte, such as char dim_info and char xyzt_units, which is not practical and require sub-byte manipulation.
  • The field float vox_offset, directly inherited from the analyze format, should in fact, be an integer. Having it as a float only adds confusion.
  • Not all software packages implement the format exactly in the same way. Vector-based data, for instance, which should be stored in the 5th dimension, is often stored in the 4th, which should be reserved for time. Although this is not a problem with the format itself, but with the use made of it, easy implementation malpractices lead to a dissemination of ambiguous and ill-formed files that eventually cannot be read in other applications as intended by the time of the file creation.

Despite these issues, the format has been very successful as a means to exchange data between different software packages. An updated format, the nifti 2.0, with a header with more than 500 bytes of information, may become official soon. (UPDATE: details here)

More information

The official definition of the nifti format is available as a c header file (nifti1.h) here and mirrored here.

FLAIR templates available

FLAIR template

A set of brain templates constructed using fluid-attenuated inverse recovery (FLAIR) images are now available for download here. These templates can be used, for instance, to help to automatically identify white matter hyperintensities (WMH; e.g. leukoaraiosis, multiple sclerosis) from magnetic resonance images (MRI), or as target for registration of other individual FLAIR images without the need of a matching T1-weighted image. Two versions are available, based on the full or on a restricted sample, each of these in three different resolutions (0.7 mm, 1.0 mm and 2.0 mm). In addition to FLAIR, templates for gray matter (GM), white matter (WM), cerebrospinal fluid (CSF) and T1-weighted (T1) are also provided. Follow the link above for more information and to download.